第一个 SpringAI 程序
在这个智能体井喷的时代,学习一门 AI 应用框架很重要,基于这个框架我们可以方便的开发自己的智能体。我擅长的语言是 Java,故准备系统的学习下 SpringAI,阿里大火的智能体 JManus 也是基于该框架完成。对于 JManus 感兴趣的,可以看下该篇文章。
本系列文章会先从一个入门级别的 SpringAI 程序开始,再过渡到统一门面接口 / 模型 / 提示语工程 / 标准输出转换器 / 记忆 Memory / 工具和 MCP / Advisor / 向量数据库 / RAG,最后基于 SpringAI,手写一个 Plan-Act 模式的智能体。
项目特性
SpringAI 是一个企业级的 Java AI 应用开发框架,支持如下特性:
- 提供统一的门面接口
ChatClient,支持同步和流式响应,简化Agent开发 - 提供统一的模型适配接口,切换模型后,仅需要改动配置项,代码不用动
- 支持所有的主流模型,例如远程的
OpenAI/Anthropic/Google等模型和本地的Ollama模型 - 支持丰富的模型类型,例如 LLM 模型 / 文生图模型 / TTS(文本转语音模型) 等
- 支持所有主流的向量数据库
- 对所有支持的模型和向量数据库提供了
SpringBoot自动配置 starter,简化模型和向量数据库的配置 - 支持将 AI 输出转化为标准的 Java POJO 模型
- 支持工具
Tool/MCP调用,可以让模型在运行时动态的调用外界接口 - 支持记忆
Memory - 支持 `RAG(Retrieval Augmented Generation)``
- 支持
Advisors模式
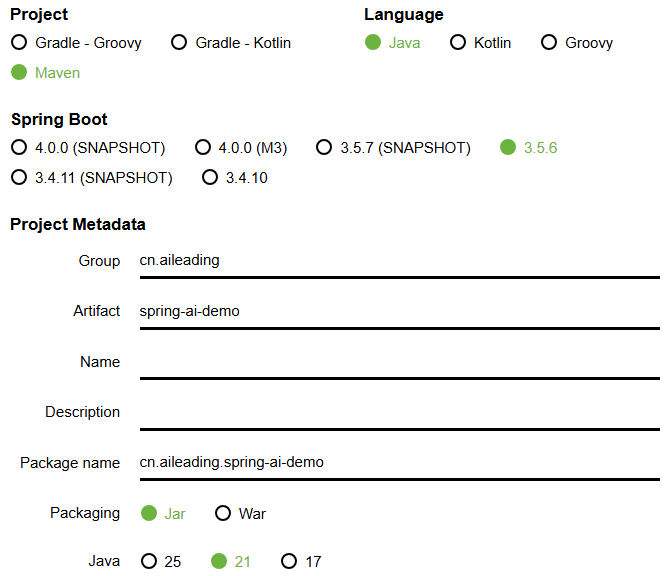
搭建工程
在 SpringBoot 脚手架页面 按照下图所示进行参数选择,之后点击“GENERATE”生成代码包。
解压该包,引入 IDEA 编辑器。
引入依赖
引入最新的 spring-ai 统一依赖版本管理配置
xml
<dependencyManagement>
    <dependencies>
        <dependency>
            <groupId>org.springframework.ai</groupId>
            <artifactId>spring-ai-bom</artifactId>
            <version>1.0.2</version>
            <type>pom</type>
            <scope>import</scope>
        </dependency>
    </dependencies>
</dependencyManagement>
web 服务接口依赖
xml
	<dependencies>
        <dependency>
            <groupId>org.springframework.boot</groupId>
            <artifactId>spring-boot-starter</artifactId>
        </dependency>
        <!-- web -->
        <dependency>
            <groupId>org.springframework.boot</groupId>
            <artifactId>spring-boot-starter-web</artifactId>
        </dependency>
	</dependencies>
配置模型
模型的使用通常有两种方式:
- 第一种是使用本地启动的 Ollama 模型服务:通常用于调试阶段,为了节省调用大模型 API 的费用,需要本地具有 GPU 算力;
- 第二种是使用远程的模型服务(通常会使用兼容
OpenAI接口协议的服务):可以去所调用模型的官网申请 apiKey,需要一定的花销。
本地 ollama 模型服务
xml
<!-- model-本地 -->
<dependency>
    <groupId>org.springframework.ai</groupId>
    <artifactId>spring-ai-starter-model-ollama</artifactId>
</dependency>
application.properties 配置文件
spring.ai.model.chat=ollama
spring.ai.ollama.base-url=http://127.0.0.1:11434
spring.ai.ollama.chat.options.model=qwen3:30b-a3b-instruct-2507-q4_K_M
说明:列出最核心的两个配置,更多配置项见 spring-ai-ollama 文档
- spring.ai.ollama.base-url:ollama 服务的基础 url
- spring.ai.ollama.chat.options.model:指定使用的 ollama 模型
远程 Qwen 模型服务(兼容 OpenAi 接口协议)
xml
<!-- openai 兼容服务-远程 -->
<dependency>
    <groupId>org.springframework.ai</groupId>
    <artifactId>spring-ai-starter-model-openai</artifactId>
</dependency>
application.properties 配置文件
spring.ai.model.chat=openai
spring.ai.openai.base-url=https://dashscope.aliyuncs.com/compatible-mode/
spring.ai.openai.api-key=填写你自己的apiKey
spring.ai.openai.chat.options.model=qwen-long
说明:列出最核心的三个配置,更多配置项见 spring-ai-ollama 文档
- spring.ai.openai.base-url:如果使用阿里云的百炼模型,填写如上,在 百炼平台 查看
- spring.ai.openai.api-key:如果使用阿里云的百炼模型,在 百炼平台 申请和查看
- spring.ai.openai.chat.options.model:如果使用阿里云的百炼模型,在 百炼平台 查看,选择一个合适的模型即可
配置 ChatClient Bean
java
@Configuration
public class SpringAIConfig {
    @Bean
    public ChatClient chatClient(ChatModel chatModel) {
        return ChatClient.create(chatModel);
    }
}
开发 Controller 接口
java
@RestController
public class Controller {
    @Resource
    private ChatClient chatClient;

    @RequestMapping("/")
    public String execute(@RequestParam("userRequest") String userRequest) {
        return chatClient.prompt(userRequest).call().content();
    }
}
启动应用
如果使用的是本地模型服务,需要首先启动 ollama 本地模型服务。
之后启动应用,浏览器访问 http://localhost:8080/?userRequest=讲一个笑话, 查看输出即可
text
当然可以!来一个轻松的: 有一天,小明去面试,面试官问他:“你有什么特长?” 小明想了想,认真地说:“我会预测未来。” 面试官笑了笑:“哦?那你预测一下,你什么时候能被录用?” 小明淡定地说:“这个嘛……我预测我不会被录用。” 面试官一愣,笑着说:“你预测得真准!你被录用了!” 小明:“……看来我的预测不准,我得改行当预言家了。” 😄 希望你笑出声!要不要再来一个? 😄文章的最后,如果您觉得本文对您有用,请打赏一杯咖啡!感谢!