模型上下文协议 MCP
作用
模型上下文协议(Model Context Protocol,简称 MCP) 为模型和工具/资源等的交互提供了一种标准化协议。通过标准化的协议极大的刺激了工具的丰富性和开放性,随着 MCP 的提出,各种 MCP 协议的工具层出不穷,极大的推动了 AI 行业的发展。
Spring AI MCP 通过 Spring Boot 集成了 MCP 官方提供的 MCP Java SDK,同时提供了 MCP Client 和 MCP Server 的自动配置方式,简化了 MCP 的开发。
核心原理
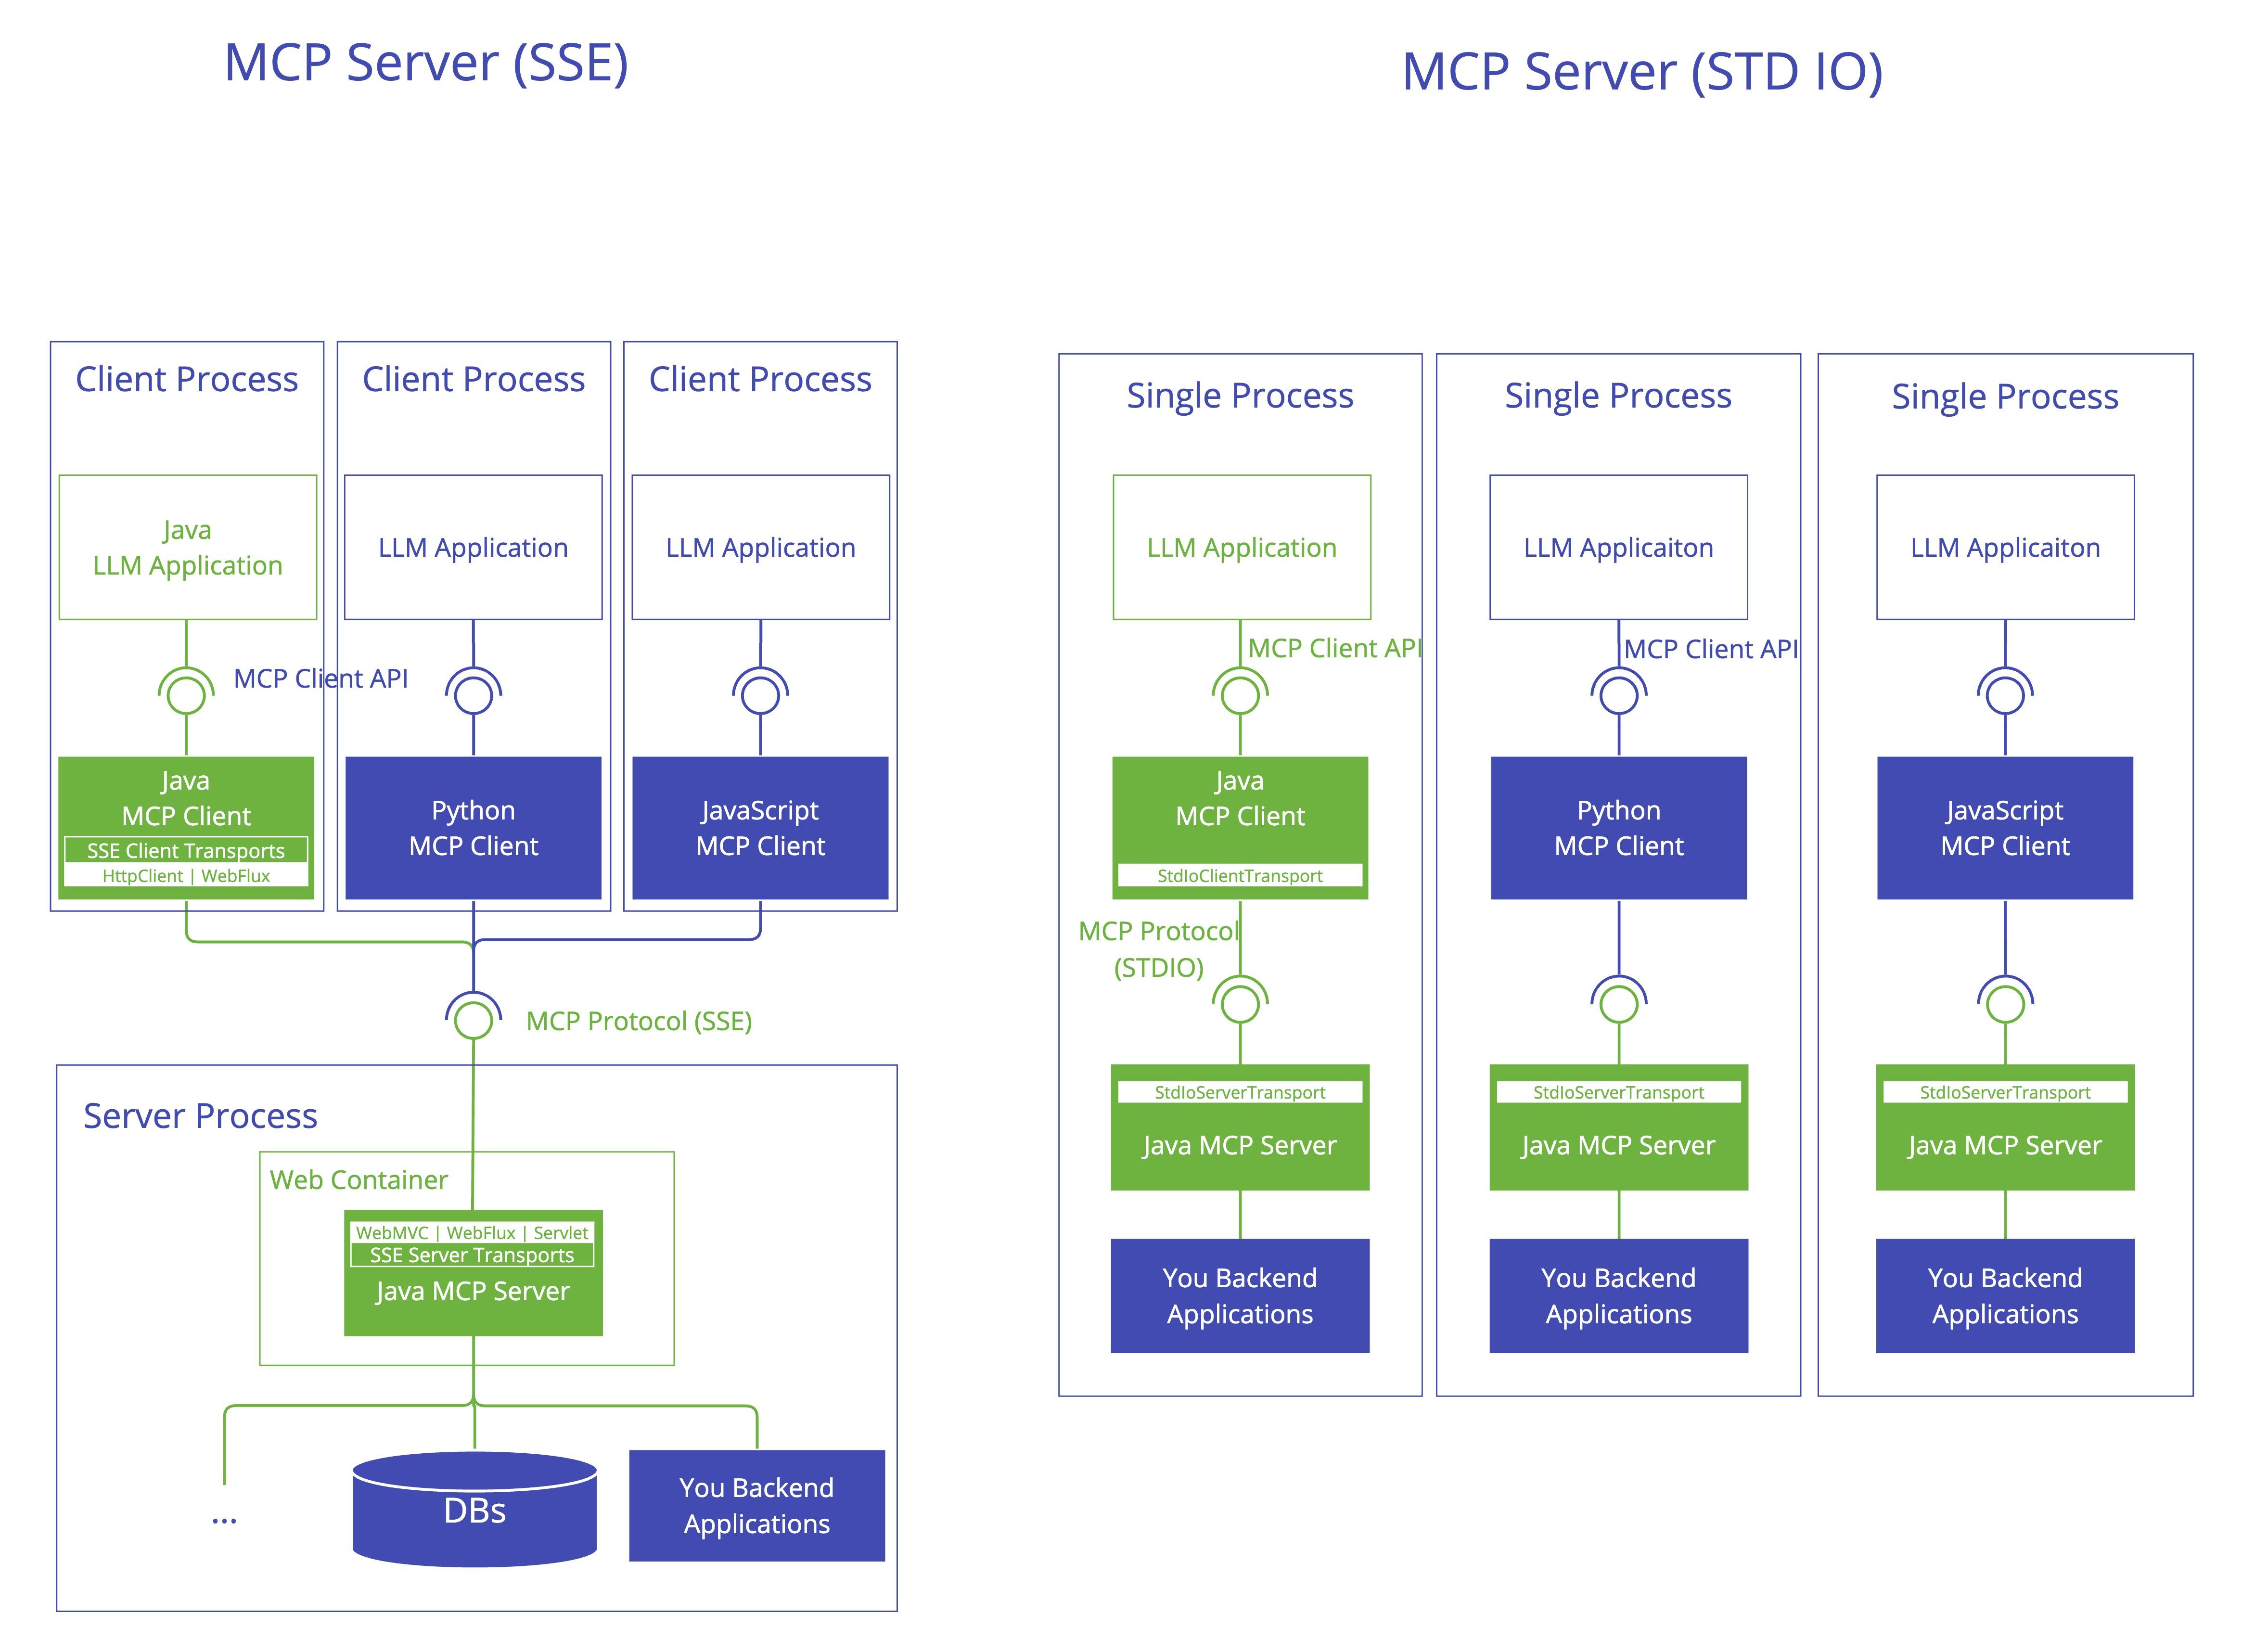
MCP 是典型的 CS(Client-Server)架构,server 提供服务,client 使用服务,其核心提供了两种协议:
- stdio 协议:将 client 与 server 部署在同一个机器上,分别启动各自的进程,通过标准输入和输出进行进程间通信
- sse(
Server-Sent Events)协议:将 client 与 server 部署在不同机器上,server 启动 http 服务,client 通过 http 协议进行访问
stdio 通信模式
MCPServer
引入依赖
xml
<?xml version="1.0" encoding="UTF-8"?>
<project xmlns="http://maven.apache.org/POM/4.0.0" xmlns:xsi="http://www.w3.org/2001/XMLSchema-instance"
         xsi:schemaLocation="http://maven.apache.org/POM/4.0.0 https://maven.apache.org/xsd/maven-4.0.0.xsd">
    <modelVersion>4.0.0</modelVersion>
    <parent>
        <groupId>org.springframework.boot</groupId>
        <artifactId>spring-boot-starter-parent</artifactId>
        <version>3.5.6</version>
        <relativePath/> <!-- lookup parent from repository -->
    </parent>
    <groupId>cn.aileading</groupId>
    <artifactId>spring-ai-demo2</artifactId>
    <version>0.0.1-SNAPSHOT</version>

    <properties>
        <java.version>21</java.version>
    </properties>

    <dependencyManagement>
        <dependencies>
            <dependency>
                <groupId>org.springframework.ai</groupId>
                <artifactId>spring-ai-bom</artifactId>
                <version>1.0.3</version>
                <type>pom</type>
                <scope>import</scope>
            </dependency>
        </dependencies>
    </dependencyManagement>

    <dependencies>
        <!-- mcp-stdio -->
        <dependency>
            <groupId>org.springframework.ai</groupId>
            <artifactId>spring-ai-starter-mcp-server</artifactId>
        </dependency>
        <!-- lombok -->
        <dependency>
            <groupId>org.projectlombok</groupId>
            <artifactId>lombok</artifactId>
            <version>1.18.42</version>
        </dependency>
    </dependencies>

    <build>
        <plugins>
            <plugin>
                <groupId>org.springframework.boot</groupId>
                <artifactId>spring-boot-maven-plugin</artifactId>
            </plugin>
        </plugins>
    </build>
</project>
说明:如果仅需支持 stdio 协议,使用以上依赖。
编写工具
java
import lombok.Data;
import lombok.experimental.Accessors;
import org.springframework.ai.chat.model.ToolContext;
import org.springframework.ai.tool.annotation.Tool;
import org.springframework.ai.tool.annotation.ToolParam;
import org.springframework.stereotype.Service;

@Service
public class WeatherService {

    @Tool(name = "getWeather", description = "getWeather", returnDirect = false)
    public Weather getWeather(@ToolParam(description = "The location of the weather,contains province,city and area") Location location) {
        if (location == null) {
            throw new IllegalArgumentException("Location cannot be null");
        }
        if (location.hangzhou()) {
            return new Weather()
                    .setCurrentLocation(location)
                    .setCurrentWeather(new Weather.WeatherInfo()
                            .setTemperature(40.0)
                            .setWeatherDescription("晴"));
        } else {
            return new Weather()
                    .setCurrentLocation(location)
                    .setCurrentWeather(new Weather.WeatherInfo()
                            .setTemperature(30.3)
                            .setWeatherDescription("阴"));
        }
    }

    @Tool(name = "setAlarm", description = "if the given temperature exceeds 37 degrees, please set a warning", returnDirect = true)
    public void setAlarm(@ToolParam(description = "weather, contains currentLocation and currentWeather") Weather weather, @ToolParam(description = "The tool context", required = false) ToolContext toolContext) {
        System.out.println("Warning: The temperature in " + weather.getCurrentLocation().getCity() + " is " + weather.getCurrentWeather().getTemperature() + "°C. 注意避暑,以下时避暑指南:" + toolContext.getContext().get("summerHeatEscapeGuide"));
    }

    @Data
    @Accessors(chain = true)
    public static class Location {
        @ToolParam(description = "The province of the location")
        private String province;
        @ToolParam(description = "The city of the location")
        private String city;
        @ToolParam(description = "The area of the location", required = false)
        private String area;

        public boolean hangzhou() {
            return "Hangzhou".equals(city);
        }
    }

    @Data
    @Accessors(chain = true)
    public static class Weather {
        private Location currentLocation;
        private WeatherInfo currentWeather;

        @Data
        @Accessors(chain = true)
        public static class WeatherInfo {
            private Double temperature;
            private String weatherDescription;
        }
    }
}
注册工具
java
@Bean
public ToolCallbackProvider weatherMCP(WeatherService weatherService) {
    return MethodToolCallbackProvider.builder().toolObjects(weatherService).build();
}
配置工具
text
spring.application.name=spring-ai-demo2
spring.main.web-application-type=none
spring.main.banner-mode=off

# mcp-server-info
spring.ai.mcp.server.name=my-weather-server
spring.ai.mcp.server.version=0.0.1
之后执行 mvn clean install,打包,假设包路径如下:D:/code/spring-ai-demo2/target/spring-ai-demo2-0.0.1-SNAPSHOT.jar
MCPClient
如果 client 和 server 是同一进程,方式如下:
java
@Resource
private ToolCallbackProvider weatherMCP;

@RequestMapping("/10")
public String execute10() {
    return chatClient2
            .prompt("What is the weather like in Hangzhou?")
            .toolCallbacks(weatherMCP)
            .call().content();
}
如果 client 和 server 是不同进程,按照如下步骤使用。
引入依赖
xml
<!-- mcp-client-stdio/sse -->
<dependency>
    <groupId>org.springframework.ai</groupId>
    <artifactId>spring-ai-starter-mcp-client</artifactId>
</dependency>
配置工具
text
# client 请求超时时间 20s
spring.ai.mcp.client.request-timeout=20000
spring.ai.mcp.client.stdio.servers-configuration=classpath:/mcp/mcp-servers-config.json
/mcp/mcp-servers-config.json
json
{
  "mcpServers": {
    "my-weather-server": {
      "command": "java",
      "args": [
        "-Dspring.ai.mcp.server.stdio=true",
        "-Dspring.main.web-application-type=none",
        "-Dlogging.pattern.console=",
        "-jar",
        "D:/code/spring-ai-demo2/target/spring-ai-demo2-0.0.1-SNAPSHOT.jar"
      ],
      "env": {
      }
    }
  }
}
说明:
- 假设有多个 mcpServer,继续在此处配置即可
-Dlogging.pattern.console=:必须配置,不然会有日志冲突问题
进行调用
java
@Resource
private SyncMcpToolCallbackProvider syncMcpToolCallbackProvider;

@RequestMapping("/11")
public String execute11() {
    return chatClient2
            .prompt("What is the weather like in Hangzhou?")
            .toolCallbacks(syncMcpToolCallbackProvider)
            .call().content();
}
说明:
- 每一个 mcpServer 都会单独起一个进程(此处是 java 进程,如果 mcpServer 是第三方提供的 python 服务,那么会起 python 进程)
- 在 client 端,会为每一个 mcpServer 创建一个 McpSyncClient,所有的 McpSyncClient 会放在 SyncMcpToolCallbackProvider 这个自动配置的 Bean 中(以同步方式说明,MCP 本身也支持异步方式)
sse 通信模式
MCPServer
引入依赖
xml
<!-- mcp-sse/stdio -->
<dependency>
    <groupId>org.springframework.ai</groupId>
    <artifactId>spring-ai-starter-mcp-server-webmvc</artifactId>
</dependency>
说明:
spring-ai-starter-mcp-server-webmvc包含spring-boot-starter-web和mcp-spring-webmvc依赖,无需重复引入- 该依赖也支持 stdio 协议,需要设置
spring.ai.mcp.server.stdio=true - 如果项目已经使用了
spring-boot-starter-web,则推荐使用spring-ai-starter-mcp-server-webmvc而不是spring-ai-starter-mcp-server-webflux
编写工具
text
与 stdio 相同注册工具
text
与 stdio 相同配置工具
text
spring.application.name=spring-ai-demo2
server.port=8082

# mcp-server-info
spring.ai.mcp.server.name=my-weather-server
spring.ai.mcp.server.version=0.0.1
之后启动服务。
MCPClient
引入依赖
text
与 stdio 相同配置工具
text
# client 请求超时时间 20s
spring.ai.mcp.client.request-timeout=20000
spring.ai.mcp.client.sse.connections.my-weather-server.url=http://127.0.0.1:8082
进行调用
text
与 stdio 相同说明:同一个 client 可以同时连接 stdio 协议的 mcpServer 和 sse 协议的 mcpServer,综合上面的配置即可。
text
spring.ai.mcp.client.sse.connections.my-weather-server.url=http://127.0.0.1:8082
spring.ai.mcp.client.stdio.servers-configuration=classpath:/mcp/mcp-servers-config.json
文章的最后,如果您觉得本文对您有用,请打赏一杯咖啡!感谢!